Today, we'll look at how to use React Hooks to build a Sign-Up form.
Forms are one of the most commonly seen components in online applications. They are frequently used to gather information from website users and visitors.
In this article we will see how to use React Hooks to implement a Sign-Up form and we will see how controlled Inputs works.
If you have never used React Hooks, I recommend you to check out more about React Hooks on this React Hooks. In Past, we had Class components, but later they were replaced by hooks because they are far superior at creating reusable and maintainable stateful logic.
Let's start setting up React Project:
You can access the full code for this article and a live demo as well on CodeSandbox.

How to Build A React Sign Up Form using Hooks:
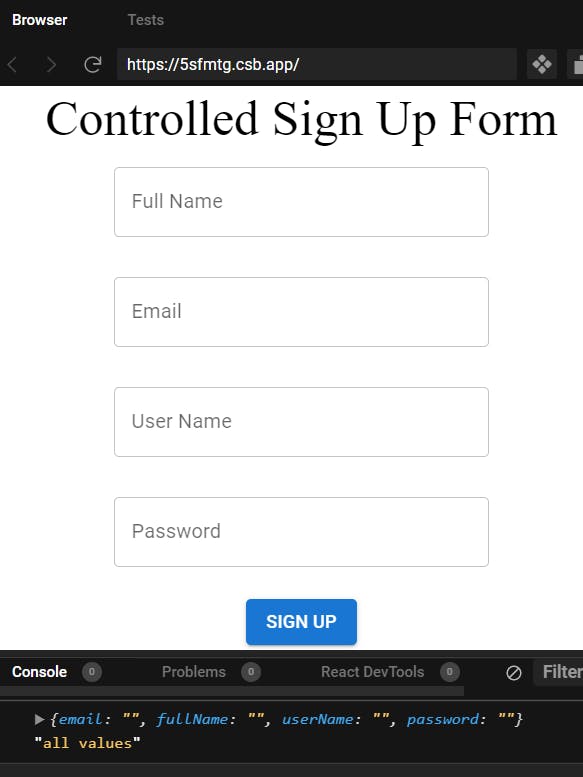
In This article we are going to build a Sign-Up Form containing four fields, these four fields are Full Name, Email, User Name and Password respectively. As you can see in the image above, you might get a basic idea of what we are going to build.
Now we will have to modifyApp.js which was auto-created when we select React as a sandbox in CodeSandbox.
App.jsx
import SignUp from "./SignUp";

function App () {
  return (
    <>
      <SignUp/>
    </>
  );
};
export default App;
App Component will render the Sign-Up component, that component we are going to create now below in this article.
We have to create now Sign-Up Component.
In the same directory, I am going to create a SignUp.js Component, this component will look like the below code snippet.
SignUp.js
import { useState } from "react";
import TextField from "@mui/material/TextField";
import Button from "@mui/material/Button";
import Box from "@mui/material/Box";

const SignUp = (props) => {
  const [user, setUser] = useState({
    email: "",
    fullName: "",
    userName: "",
    password: ""
  });

  const handleChange = (e) => {
    const updatedUser = {
      ...user,
      [e.target.name]: e.target.value
    };
    setUser(updatedUser);
  };

  const handleSubmit = (e) => {
    console.log(user);
  };
  console.log(user, "all values");

  return (
    <>
      <Box sx={{ textAlign: "center", fontSize: 40 }}>
        Controlled Sign Up Form
        <form onSubmit={handleSubmit}>
          <div>
            <TextField
              id="fullName"
              label="Full Name"
              name="fullName"
              value={user.fullName}
              onChange={handleChange}
              variant="outlined"
              sx={{ width: 300, margin: 2 }}
            />
            <br />

            <TextField
              id="email"
              label="Email"
              name="email"
              value={user.email}
              onChange={handleChange}
              variant="outlined"
              sx={{ width: 300, margin: 2 }}
            />
            <br />

            <TextField
              id="userName"
              label="User Name"
              name="userName"
              value={user.userName}
              onChange={handleChange}
              sx={{ width: 300, margin: 2 }}
            />
            <br />

            <TextField
              id="password"
              label="Password"
              name="password"
              value={user.password}
              onChange={handleChange}
              variant="outlined"
              sx={{ width: 300, margin: 2 }}
            />
          </div>

          <div>
            <Button variant="contained" onClick={handleSubmit}>
              Sign Up
            </Button>
          </div>
        </form>
      </Box>
    </>
  );
};
export default SignUp;
Now We can break down this long code into a few blocks and understand how it works.
1. Storing the state of the Fields:
We have four fields in the Sign-Up so we have used useStatehook to store the state of the user including all the four fields as shown below.
const [user, setUser] = useState({
    email: "",
    fullName: "",
    userName: "",
    password: ""
  });
2. HandleChange event:
We will have to capture the inputs provided by the user by applying the onChange event on each input field, which will keep updating us what are the values user entered so far.
const handleChange = (e) => {
    const updatedUser = {
      ...user,
      [e.target.name]: e.target.value
    };
    setUser(updatedUser);
  };
3. Submission of the Form:
Now, At the end of the Form we will have to call the handleSubmit function to collect all the entered values by the user.
const handleSubmit = (e) => {
    console.log(user);
  };
  console.log(user, "all values");
Finally, You will be able to see all the values which a user entered in the sign-up form.
I hope this overview of forms in React was helpful! There are lots more such as Validations and all we can do with forms. If you want to see more on forms, let me know in the comments.
Thanks for reading!!
You can check out my other articles as well on:
Conditional Rendering in ReactJS
JSX in React - Detailed Explanation with example
How and where to deploy your React App in less than 5 minutes..
What are Controlled and Uncontrolled Components in React JS? Which one to use?
